I know it has been a while (February 1st to be exact). But I’ve been working hard on other projects, including this gem. So without further ado . . . the fourth in my Reflections on Seesaw series, today I will share how I have worked to make Seesaw an interactive learning space.
My students and I love Seesaw–and the learning that is happening as they use it–so much that we can’t wait to share with our other teachers and students the many possibilities for home-school communication, showcasing and sharing student work, and increasing student engagement and collaboration.
Since I started using Seesaw my goal was to make Seesaw more than just a place to digitally display student work. It is so easy to just set it up, teach students to post their work, and that be it. But I wanted Seesaw to be an interactive and reflective learning space where students could rejoice in their successes and correct misconceptions. Back in January, one of my #teachergoals for the new year was to make our Seesaw class feed more interactive. Originally, I planned to start with the commenting and like features of Seesaw for me to give feedback and for students to comment on their classmates’ work to give encouragement and constructive criticism. Later, I would “assign” work through Seesaw, where students receive instructions through the feed and then complete the activities within Seesaw. However, the process went in the completely opposite direction than I intended.
Going Interactive
It started with teaching students about the copy and edit feature for a formative assessment on synonyms. My digital learning coach suggested I start with one new feature at a time, so this assignment only required students to copy and edit an assignment I created and then move the labels to match words that were synonyms. We then did a similar assignment but this time with antonyms.
Since those went so well, I decided to up the ante. I created an assignment where students would sort sets of synonyms and antonyms. Within Seesaw, they would have to copy and edit and move the labels like they did before, but this time choose a set of synonyms or antonyms, explain how they knew they were synonyms or antonyms using the recording feature, and then use the label feature to use those words in sentences. I reminded students how to copy and edit and move the labels I created (they knew how to record), and I modeled how to use the label feature. But too many moving parts and new pieces of information caused the students not to meet the objective of the assignment.
Mission FAILed!
That night, as I looked at the incomplete or incorrect assignments received, I knew the activity wasn’t a total success . . . Okay that’s putting it lightly: It was a FAILure. FAIL, as in “First Attempts In Learning”. This is something I may have heard before, but it stuck with me after hearing it at SC EdTech. So I went back to the drawing board. I tried to figure out where students got lost. It was their third time copying and editing an activity I assigned and their third time moving labels. But it was their first time creating a label and recording in a drawing. Adding those last 2 extra pieces was a bit too much.
What I Learned
So I decided in the future that I would do one, or all, of these things when introducing a new assignment:
- Give an exemplar. Show students what my expectations are without giving away the “answer.”
- Give students one step at a time. For the synonyms and antonyms assignments, I could have had students copy and edit the first assignment. Next, they’d copy and edit and add a sentence by creating a label. And finally, on the last assignment, copy and edit, add a sentence, and add their explanation via voice recording.
- Give checklists for multiple steps. This is what I chose to do after the fact with this assignment. Students used this checklist and worked with partners to determine if they completed the assignment by following all of the directions.
- Provide pictorial directions. I got a great 3-column format (2-column for younger students) from our media specialist that I’ve been using with my students. In the first column are written directions, in the second column are pictorial hints (like what an app looks like or a screenshot of what they might see), and in the final column are extras that students can try out if we are working as a class step-by-step. Here’s an example of some Seesaw pictorial directions I created for the label tool. (Additional posts about how I’m using pictorial directions to be coming soon.)
- Give students scripts to explain. While I had used scripts before, it didn’t occur to me to use one on this assignment. A script helps students plan and practice what they are going to say before hitting the record button.
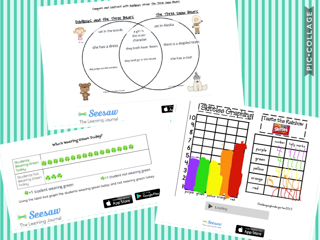
We have since done many more interactive assignments from a Venn Diagram using labels, to pictographs using emojis and bar graphs using the drawing tool. Lately, I have even begun to use Seesaw to push out links like our digital reading log using Padlet (I’m so excited about this!) and lessons that I want students to check out.
And while I have used the comment and like features myself and have allowed students to use them as well, we didn’t have a formal lesson on commenting and the types of feedback to give each other, yet. It started with “good” or “I like this.” But I’ve encouraged them along the way to make comments that include details and are specific to the post. Some of the comments on our biography projects included, “I like your pictures,” or “I like that you choose a writer because I’m writing a book.” Some students even ask questions, which I love because that’s a standard we have been working very hard on! One little fellow likes to respond to his mom’s comments and searches for them every time he gets on the app. There are a lot of “I love you, Mom!” comments on his items.
Although my aim was to make Seesaw interactive, the actual result has been using Seesaw for a digital workflow where students are receiving and complete assignments and creating their own products, too. The whole journey has been such a meaningful learning experience for the students and me.
Please be sure to check out the other posts in this series, Reflections on Seesaw: Why I Want to Be a Seesaw Ambassador, Four Ways to Use Seesaw in Your Classroom Now, and Using Seesaw with Your English Language Learners!
***And a quick update to my post 17 Things I Want to Try in 2017, I entered my school into a STEM challenge and I have been trying to incorporate more STEAM activities into my daily instruction. Stay tuned for more on these topics! ***